
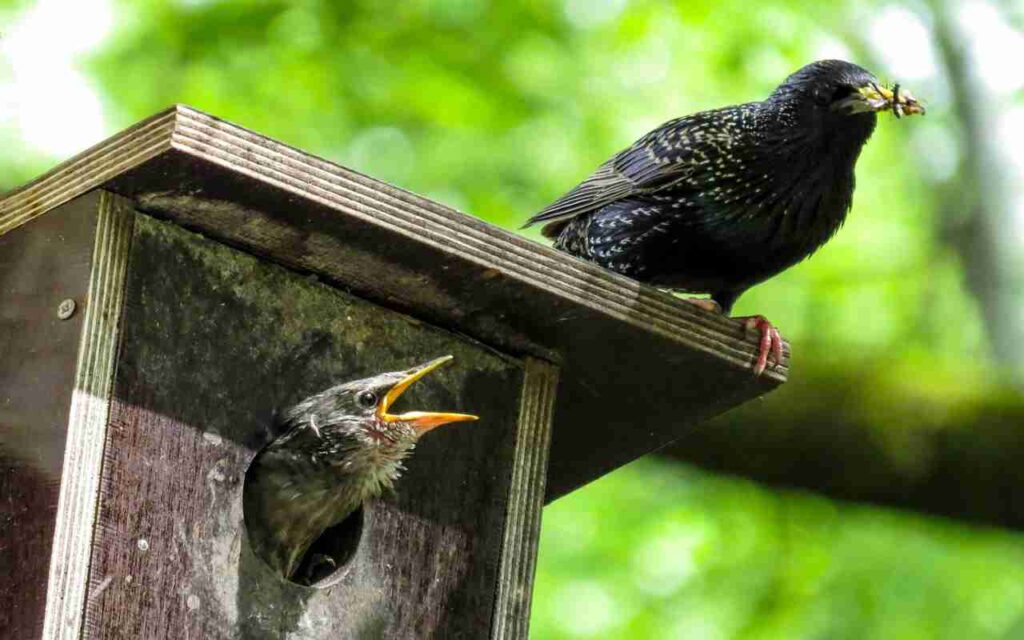
You know that cute birdhouse you put up last spring? The one where a family of chickadees raised their babies? Yeah, it’s probably crawling with parasites right now. Gross, I know, but that’s nature for you. That’s why knowing how to clean birdhouses properly is so important for keeping your feathered visitors safe.
Here’s the reality: dirty birdhouses aren’t just unsanitary, they’re genuinely dangerous for birds. Old nesting material becomes a breeding ground for mites, bacteria, blowfly larvae, and fungi that attack the next generation of birds who try to move in. Studies show these nest parasites can cause anemia, weight loss, and even death in nestlings 😳.
The good news? Cleaning birdhouses is stupidly easy, takes maybe 15 minutes, and dramatically improves nesting success rates for your backyard birds. I’ve been maintaining nest boxes for years, and I can tell you from experience that the difference between a clean box and a dirty one is night and day when it comes to attracting healthy bird families.
- Ensure the birdhouse is empty before cleaning to avoid disturbing nests.
- Remove all old nesting material and dispose of it safely.
- Scrub interior walls with hot soapy water and a stiff brush or scraper.
- Disinfect with bird-safe solutions like diluted bleach or vinegar.
- Rinse thoroughly and let the birdhouse dry fully in sunlight.
- Repair or replace damaged boxes; check ventilation and drainage.
- Follow seasonal cleaning: spring prep, mid-summer, fall, winter.
- Prevent parasites, mold, and wasp nests by regular monitoring.
- Use boxes with clean-out panels, removable floors, and vents.
- Keep a cleaning log to track maintenance and recurring issues.
Why Cleaning Birdhouses Really Matters
Let’s talk about what happens when you skip birdhouse maintenance. Spoiler alert: it’s not pretty.
Show Transcript
0:00
You know that charming little birdhouse in your backyard? Well, it might be hiding a pretty dangerous secret.
0:06
Today, we’re going to pull back the curtain on the maintenance that keeps your feathered friends safe, healthy, and most importantly, coming back year after year.
0:14
I know it’s a bit of a jarring thought, isn’t it? That sweet little box where you watched a family of birds grow up—it’s probably not so pristine anymore.
0:21
Let’s be real. Without a good cleanout, it becomes a breeding ground for some truly nasty stuff you definitely don’t want in your baby birds.
0:29
So, what are we really talking about here? This is more than just a messy house. Leftovers from an old nest can be a serious, even deadly, problem for the next family that moves in.
0:43
A dirty birdhouse isn’t just uninviting. It can literally be a deadly trap for those vulnerable nestlings.
0:54
These threats are very real. We’re talking feather mites that cause irritation and feather loss, or even blowfly larvae that feed on nestlings, weakening or killing them.
1:10
And of course, harmful bacteria thrive in that old material. The difference a little cleaning makes is night and day.
1:21
A dirty box is a huge gamble—disease, nesting failure, and birds that won’t come back. A clean box? That’s an open invitation for success: healthy chicks and bird families returning year after year.
1:36
The choice seems obvious, right? Convinced? Good.
1:40
Cleaning out your birdhouse is actually super simple. You don’t need fancy equipment.
Tools You’ll Need
1:47
Here’s your toolkit: work gloves and an N95 mask—for your protection from dust, droppings, or mites.
1:58
A putty knife for stuck-on gunk, and a stiff brush for most of the cleaning.
2:04
Disinfecting? Use one part bleach to ten parts water, or a vinegar solution.
2:09
And here’s a big one: no scented cleaners. Birds’ sense of smell is extremely sensitive—artificial smells will drive them away.
Step-by-Step Cleaning
2:18
Step one: make sure the house is empty. Never disturb an active nest. A gentle tap and peek will tell you if it’s safe.
2:40
Step two: remove all old material and scrub the inside with hot, soapy water.
2:46
Step three: disinfect. Let the solution sit a few minutes, then rinse completely. Chemical residue is harmful.
2:53
Step four: air dry in the sun. UV rays are a natural sanitizer.
3:02
Step five: put it all back together. Check drainage and ventilation holes, then hang it up. Your birdhouse is sparkling clean!
Year-Round Maintenance
3:11
This isn’t a one-and-done job. A year-round schedule helps.
3:21
Spring: final prep before nesting season.
Summer: some birds raise multiple broods—quick cleanouts help.
Fall: deep clean once everyone has moved out.
Winter: repair leaky roofs or wobbly perches.
Pro Tips for Success
3:42
When buying or building a birdhouse, choose ones with good ventilation and drainage to prevent moisture and heat buildup.
4:03
Watch for pests like wasps. Keeping a simple calendar or log helps you track cleaning.
4:13
Bonus: leave a small pile of twigs, moss, or grass clippings nearby—new tenants get a head start on building a clean nest.
4:21
This effort isn’t just cleaning a box. You’re creating a safe, healthy, desirable home that attracts birds and lets you enjoy new families season after season.
4:34
So the next time you look out at that birdhouse, you’ll know exactly what to do to make it the safest, best home on the block.
4:45
The only question left is: is your backyard ready for its next happy family?
Old nests can hide parasites such as blowfly larvae, mites, lice, and hen fleas. These blood-feeding pests weaken nestlings and can lower their chances of survival. A study published in Ecology and Evolution found that blowfly infestations in cavity-nesting birds noticeably reduced nestling growth and led to lower fledging success.
But it’s not just parasites. Old nesting material retains moisture, creating perfect conditions for bacteria and mold growth. The organic matter, feces, feather powder, and leftover food decompose inside the box, turning it into a health hazard. Ever opened an old birdhouse and gotten hit with that musty, awful smell? That’s what I’m talking about.
Birds aren’t stupid. They recognize contaminated nest sites and will abandon them in favor of cleaner options. Some species will actually build a new nest on top of an old one, but this creates problems. The new nest sits higher, making eggs and chicks easier for predators to reach. Plus, all those parasites from the old nest just migrate upward into the new one.
Want to attract nesting birds successfully? Learn more in our guide on how to attract nesting birds.
When Should You Clean a Birdhouse? (Season-by-Season Breakdown)
Timing matters. Clean too early, and you might disturb an active nest. Clean too late, and parasites get established for next season. Here’s the optimal schedule.
Spring Cleaning (Late February to Mid-March)
This is prime prep time. You should clean nest boxes by February in southern regions and by mid-March in northern areas. This gives you enough time to sanitize boxes before birds start scouting for nest sites.
Early spring cleaning removes any debris from fall and winter, including roosting material if birds used your box for winter shelter. Check for wasp nests, mouse nests, or other unwanted occupants and evict them now. Trust me, dealing with a small wasp nest in March beats tackling a massive one in July.
Summer Mid-Season Checks (June to July)
Some species, like bluebirds and house wrens, raise multiple broods. Between broods, do a quick check. If the first family has fledged and the box sits empty for a week, you can do a light cleaning to prep for the next round.
Watch for wasp colonization during summer. Wasps love moving into empty nest boxes, and they move fast. A quick mid-summer check prevents this problem before it becomes a stinging nightmare.
Fall Deep Clean (September to November)
This is THE most important cleaning of the year. Once you’re certain nesting season has ended and all birds have fledged, do a thorough deep clean. Fall cleaning removes all nesting material and parasites before they overwinter in your box.
Fun fact: some birds use nest boxes as winter roosts, huddling together for warmth. If you want to support roosting birds, you can skip fall cleaning on a few boxes specifically designated for winter use. Just make sure you clean those in early spring instead.
Winter Maintenance (December to February)
Winter is perfect for repairs. Check boxes for weather damage, loose screws, cracked wood, or failing hinges. Replace any boxes that are beyond repair. This is also when I add drainage holes if boxes are retaining too much moisture, or improve ventilation if I noticed condensation issues during the previous season.
For more ideas on supporting birds year-round, check out our article on how to make a bird sanctuary in your backyard.
Tools & Supplies You’ll Need (Safe for Birds)
Don’t overcomplicate this. You need maybe five things, most of which you probably own already.
Work gloves are non-negotiable. Old nests can harbor disease, and some parasites will bite humans. Latex or nitrile gloves work, but I prefer leather work gloves for durability.
A dust mask or N95 respirator protects you from breathing in feather dust, dried feces, and mold spores. Trust me on this. The first time I cleaned a really old nest box without a mask, I spent the next day sneezing and wheezing. Not fun.
Scrub brush and scraper help remove stuck-on debris. A stiff-bristled brush works great for interior walls. For really caked-on material, a putty knife or paint scraper does the job without damaging the wood.
Bird-safe disinfectant is crucial. The gold standard is a 1:10 bleach solution, one part bleach to nine parts water. This dilution kills bacteria, fungi, and parasite eggs effectively without being so strong it damages wood or creates dangerous fumes. White vinegar mixed 50/50 with water works as a gentler alternative, though it’s less effective against tough bacteria.
A bucket of hot water helps with scrubbing and rinsing. Boiling water can be used as a final rinse for extra sanitization, especially if you had heavy parasite loads.
What NOT to use: scented cleaners, harsh chemicals, pesticides, or anything with strong artificial fragrances. Birds have sensitive respiratory systems, and they rely on scent cues. Artificial smells can deter them from using your box.
How to Safely Open a Birdhouse (Without Breaking It)
Most well-designed birdhouses have a clean-out panel, either on the side, front, or top. Look for hinges, latches, or screws that indicate where the box opens.
Side-opening boxes are my favorite. They give easy access and usually stay attached at the hinge, so you can’t accidentally drop the panel. Front-opening boxes work well too, but be careful, the entire front swings open, exposing the interior completely.
Top-opening boxes require more care. You’ll need to reach down inside to scoop out nesting material, and it’s harder to scrub the interior thoroughly. But they work fine with practice and a long-handled brush.
What if your birdhouse has no clean-out door? This is frustratingly common with decorative birdhouses. You’ll need to either reach in through the entrance hole with your tools (awkward and ineffective) or, if that’s impossible, retire that box and replace it with a properly designed one. Seriously, a birdhouse you can’t clean is worse than no birdhouse at all.
Before opening any box, tap on it gently and wait a few seconds. Listen for movement or chirping. You want to be absolutely certain the box is empty. Disturbing an active nest isn’t just rude, it’s illegal under the Migratory Bird Treaty Act for most native species. Fines can reach thousands of dollars, so yeah, double-check.
Step-by-Step: How to Clean a Birdhouse Properly
Alright, let’s do this.
Step 1: Confirm the box is empty. Tap the box, peek inside, and verify zero birds, eggs, or active nests. If you see anything alive, close it back up and check again in a week.
Step 2: Remove old nesting material. Wearing gloves and a mask, pull out all the old nest material. Some nests come out in one piece like a little cup, others are stuck fast and need scraping. Dispose of everything in a sealed plastic bag and toss it in the trash. Don’t compost it, parasites and their eggs can survive composting temperatures.
Step 3: Scrape and scrub the interior. Use your scraper to remove stuck-on feces, cocoons, or debris from corners and walls. Then scrub every surface with your stiff brush and hot soapy water. Pay special attention to corners where parasites hide and the ceiling where wasps like to start nests.
Step 4: Disinfect thoroughly. Apply your bleach solution (1:10 ratio) generously to all interior surfaces. Use a spray bottle or sponge to coat walls, floor, and ceiling. Let it sit for 10-15 minutes to kill bacteria, mites, and parasite eggs. For vinegar solutions, let them sit for 20 minutes since they work more slowly.
Step 5: Rinse completely. This step is critical and often skipped. Rinse away all cleaning solution with clean water. Any residual bleach can irritate birds’ respiratory systems or corrode their feet. I usually do at least two rinses to be safe, better paranoid than sorry.
Step 6: Dry in the sun. Leave the birdhouse open and let it air dry completely in direct sunlight. UV rays provide additional sanitization, killing any remaining pathogens. This usually takes 4-6 hours on a sunny day. Never seal up a damp birdhouse; moisture encourages mold growth and you’ll be back to square one.
Step 7: Reassemble and reinstall. Once bone-dry, close up the box and put it back in position. Check that drainage holes are clear and ventilation openings aren’t blocked by cobwebs or debris.
Step 8: Record your maintenance. I keep a simple log noting when I cleaned each box and any issues I found. This helps me remember which boxes need attention and track patterns over years. For example, if one box consistently has heavy parasite loads, maybe its location encourages moisture retention.
For more on keeping your backyard bird-friendly, read our guide on responsible bird feeding.
Seasonal Cleaning: What Changes Each Season
Different seasons call for different approaches. Here’s how to adapt your cleaning routine.
Spring Prep
Focus on making boxes as appealing as possible. Birds are choosy about nest sites, and a fresh-smelling, clean box wins every time. Remove any winter roosting material left by chickadees or bluebirds who bunked together during cold snaps.
Check for mouse nests and evict them before birds arrive. Mice love appropriating birdhouses, and their nests smell terrible to birds. Plus, mouse droppings can carry hantavirus, so wear that mask.
Make any needed repairs now. Tighten loose screws, replace cracked boards, and ensure predator guards are secure. Birds won’t nest in boxes that feel unsafe or unstable.
Summer Checks
This is less about deep cleaning and more about monitoring. Open boxes briefly to check on progress, but don’t clean while birds are actively nesting, that’s both cruel and illegal.
Watch for wasp nests forming in empty boxes or boxes between broods. Remove small wasp nests immediately before they get established. For large nests, wait until evening when wasps are less active, or call pest control if you’re allergic to stings. No bird box is worth a trip to the ER.
According to Sialis, it’s worth checking for blowfly larvae if nestlings seem unusually pale, weak, or have small bloody spots on their skin. In serious cases, you can gently remove any visible larvae with tweezers, but only if the nestlings are clearly at risk.
Fall Deep Clean
This is your opportunity to completely sanitize everything. Remove every scrap of nesting material, don’t leave even tiny bits behind. Scrub more aggressively than you did in spring. Use the boiling water method if you had heavy parasite loads during the season.
Inspect the box for winter-worthiness. Seal any new cracks, ensure the roof is waterproof, and verify drainage holes work properly. Birds might use these boxes for roosting during harsh winter weather, so they need to be in top shape.
I also check for structural issues that weren’t obvious in spring. Wood rot, warped panels, or weakened mounting brackets all become apparent after a season of use and weather exposure.
Winter Repairs
Pull down boxes that need major repairs and work on them in your garage where it’s warm. Sand rough edges, replace rotted wood, repaint or restain if needed using bird-safe products. This is also when I build new boxes to replace ones that failed completely.
Consider adding roosting modifications to a few boxes. Block ventilation holes with removable plugs to trap heat, or add interior roosting ladders (just small wooden dowels) to help multiple birds huddle together on cold nights.
How to Deal with Parasites, Mold, or Wasp Nests
Sometimes you open a birdhouse and immediately regret it. Here’s how to handle the worst-case scenarios.
Blowfly Larvae
Research from NestWatch shows that bird blowflies are common parasites in many nests, but they rarely cause chick mortality on their own. Problems usually happen only when blowflies combine with other stressors like food shortages or poor weather.
If you find them after birds have fledged, remove all nesting material and disinfect thoroughly. The larvae pupate in nest material, so getting rid of it breaks the lifecycle and prevents them from emerging as adult flies to infest next year’s nests.
For active nests with severe infestations, we’re talking dozens of larvae per nestling, you can carefully remove visible larvae from nestlings using tweezers. This is delicate work and should only be done if nestlings are clearly suffering. Some experts suggest adding fresh green plant material to nests, which may help reduce parasite infestation and create a healthier environment for nestlings.
Mites and Fleas
Tiny reddish-brown specks that move? Those are mites. They’re incredibly common and can reach massive numbers in dirty boxes. I once opened a box and the entire floor seemed to be moving, thousands of mites swarming everywhere. It was like a horror movie.
Regular cleaning is your best defense. Hot soapy water and bleach solution kill them effectively. Make sure you get into every corner and crack where they hide.
Fleas are harder to see but just as problematic. If you see birds spending unusual amounts of time preening or notice feather damage, suspect fleas. The boiling water method works great against flea eggs that regular scrubbing might miss.
Mold and Mildew
Black or green fuzzy growth means moisture problems. Clean thoroughly with bleach, then address the root cause. Add more drainage holes, improve ventilation, or relocate the box to a less humid spot. Persistent mold might mean the box is beyond saving, wood that’s thoroughly colonized by mold won’t ever be truly clean again.
Wasp Nests
Small paper nests can be scraped out with a putty knife. For larger nests or aggressive wasp species, wait until late evening or early morning when wasps are sluggish from cold. Wear protective clothing, long sleeves, gloves, even a beekeeper’s veil if you’ve got one, and knock the nest into a bucket of soapy water, which drowns wasps quickly.
Prevention is easier than removal. Spray the interior top of clean boxes with cooking spray or rub it with bar soap. The slippery surface prevents wasps from anchoring their nests properly.
How Often Should You Clean? (Expert Recommendations)
The short answer: at least once per year, ideally twice.
Cleaning between breeding seasons is standard practice, with late summer or fall being the optimal time for most regions. This removes parasites before they overwinter and prepares boxes for next spring’s residents.
For species that raise multiple broods, like bluebirds, cleaning between broods can improve second-brood success rates. Just make absolutely sure the first brood has completely fledged before you clean. Wait at least a week after the last nestling left to be safe.
Some bird species, notably house wrens, actually clean their own nests between broods. They’ll remove fecal sacs and debris, keeping things relatively tidy. For these natural housekeepers, annual cleaning suffices. But even “clean” species benefit from human help once a year.
The exception: if you notice heavy parasite loads, frequent moisture problems, or disease (dead nestlings, unusual behavior), clean more often. Better to over-clean than to let problems fester and spread to future broods.
Want to learn more about specific bird behaviors? Check out our article on nesting habits of chickadees.
How to Make Birdhouses Easier to Clean (Design Tips)
If you’re building or buying new birdhouses, design matters tremendously. Good nest box design makes maintenance infinitely easier and safer for birds.
Hinged access panels are essential. Side panels work best, giving full access to the interior without removing the entire box from its mount. Top-hinged roofs work too but make scrubbing harder since you’re reaching down into the box. Avoid boxes with no clean-out access entirely, they’re decorative paperweights, not functional birdhouses.
Removable floors with drainage holes help too. You can pop out the entire floor, dump old nests, and clean the floor separately. Some designs use slide-out trays, which are even better.
Drainage holes in the floor keep moisture from accumulating. I drill four 1/4-inch holes in each corner of the floor. Water drains out immediately, nests stay drier, and mold becomes far less likely. This simple feature prevents 90% of moisture problems.
Ventilation gaps near the roof prevent heat buildup and reduce humidity. Small gaps (1/4 inch) along the sides, just below the roof overhang, work perfectly. Don’t make vents so large that rain gets in, that defeats the purpose.
Smooth interior walls (but not too smooth) make cleaning easier. Rough-sawn wood is ideal. It gives baby birds traction for climbing to the exit hole but doesn’t create deep grooves where parasites hide. Avoid heavily textured or carved interiors.
No perches. Birds don’t need them for entering the hole, and perches give predators and invasive house sparrows better access. If a box comes with a perch, remove it immediately.
Predator guards like metal entrance hole protectors prevent squirrels and woodpeckers from enlarging holes. They also protect during cleaning since you won’t need to repair entrance holes as often. Noel predator guards are my favorite, they extend several inches out from the entrance, making it harder for predators to reach inside.
If you’re building your own boxes, check out our guide on DIY bird feeder from recycled materials for inspiration on working with repurposed materials safely.
What NOT to Do When Cleaning a Birdhouse
Let’s talk about common mistakes that well-meaning people make. I’ve made most of these myself, so learn from my failures.
Don’t use harsh chemicals or scented cleaners. Pine-scented disinfectants, ammonia, or perfumed soaps will repel birds. That lovely “spring breeze” smell you love? Birds hate it. Stick to plain bleach or vinegar solutions only, and rinse thoroughly.
Don’t pressure wash. The force can damage wood, push water into cracks where it’ll cause rot, and strip away protective finishes. Hand scrubbing works better anyway and gives you a chance to inspect for damage.
Never clean during active nesting. This is both cruel and illegal. Disturbing most native bird nests violates the Migratory Bird Treaty Act, with fines up to $15,000 and potential jail time for repeat offenders. Wait until you’re certain birds have fledged.
Don’t add artificial nesting material. Birds are incredibly picky about what they build with. Let them source their own materials. Exception: if you’re specifically trying to attract birds, you can leave natural materials like dried grass, pet fur, or small twigs nearby in a suet cage, but don’t stuff them inside the box. That’s just weird and off-putting to birds.
Don’t seal up a damp box. Mold grows fast in enclosed humid spaces. Always let boxes dry completely, and I mean bone-dry, not just “feels dry”, before closing them up. Leave them open in sunlight for at least 4-6 hours.
Don’t ignore structural damage. A cracked box, loose roof, or failing hinge won’t magically fix itself. Repair it or replace the box. Birds won’t use unsafe structures, and you’re wasting your time maintaining a box that’s falling apart.
How to Keep Birdhouses Cleaner for Longer
Prevention beats remediation every time. Here’s how to minimize future cleaning headaches.
Choose the right location. Boxes placed in partial sun with good air circulation dry faster and resist mold better than boxes in deep shade. Avoid spots under heavy tree canopy where moisture drips constantly or in low-lying areas where humidity lingers.
Face entrance holes away from prevailing rain. In most of North America, this means facing boxes east or southeast. This keeps wind-driven rain from blasting directly into the box during storms.
Ensure proper drainage and ventilation. These design features aren’t optional luxuries, they’re critical for maintaining a dry, healthy interior environment. Check them annually and improve them if needed.
Deter invasive species. House sparrows and European starlings are non-native and not protected by law. They’re aggressive nest competitors that create messy, parasite-ridden nests and sometimes kill native cavity nesters. Using species-appropriate entrance hole sizes helps exclude them. Bluebirds need 1.5-inch holes; house sparrows prefer 1.75 inches or larger.
Monitor regularly. Quick weekly checks during nesting season let you spot problems early. You can remove wasp nests before they get huge, notice if moisture is accumulating, or catch parasite outbreaks while they’re still manageable.
Consider multiple boxes. Spreading out nest boxes reduces competition and prevents parasites from easily spreading between nests. Space boxes at least 25-50 feet apart for territorial species like bluebirds, or cluster them for colonial nesters like purple martins.
Frequently Asked Questions
Should I remove a nest mid-season?
Only if the nest is abandoned or birds have already fledged. Never disturb active nests with eggs or nestlings unless there’s a genuine emergency like severe parasite infestation threatening nestling survival. Even then, consult with wildlife experts first.
Is bleach safe for birds?
Yes, when properly diluted (1:10 ratio) and thoroughly rinsed away. A weak bleach solution kills parasites and bacteria effectively without harming birds. The key is rinsing completely so zero residue remains. Let boxes dry fully in sunlight before birds return, and the sun’s UV rays break down any trace amounts.
Do birds care if their birdhouse smells like humans?
Most cavity-nesting birds don’t care much about human scent. They’re more concerned with structural features, predator safety, and parasite loads. Don’t worry about your smell “contaminating” boxes, that’s a myth from mammal wildlife rehabilitation where scent actually matters.
Should you clean after every brood?
For species raising multiple broods, cleaning between broods can help the second clutch succeed. But make sure the first brood has completely fledged first, wait at least a week after seeing the last nestling leave. For single-brood species, annual cleaning suffices.
What if I see bugs inside?
Depends on the bugs. A few ants or spiders are normal and harmless. Heavy mite infestations, blowfly larvae, or wasps need immediate attention. Remove nesting material and disinfect thoroughly, but only after birds have finished using the nest.
Can I paint the inside of a birdhouse?
No. Interior paint can trap moisture and emit fumes that irritate birds’ sensitive respiratory systems. Keep interiors natural wood only, with no stains, paints, or sealers. You can paint or stain exteriors with bird-safe, water-based products for weather protection, but leave interiors completely bare.
When do birds return to check out nest boxes?
Birds scout for nest sites starting in late winter, often while snow is still on the ground. Males often claim territories in February or March depending on your region. Having clean boxes ready by then maximizes your chances of attracting early-season nesting pairs.
Conclusion: Ready for New Occupants
Clean birdhouses aren’t just nicer looking, they’re healthier, safer, and way more likely to attract successful nesting birds. The time investment is minimal. Fifteen minutes per box, once or twice a year, makes a huge difference for birds trying to raise their families.
You’re removing parasites that would otherwise harm nestlings, preventing disease transmission between generations, and creating a clean slate for new families to move in. Research on nest‑box environment and parasite loads shows that nest‑box design, material, and cleanliness significantly influence nest success and disease risk in cavity‑nesting birds.
Make cleaning part of your seasonal routine. Mark it on your calendar if you need to. Fall cleaning before winter and spring prep before nesting season covers most bases. Add mid-season checks if you’re monitoring multiple-brood species like bluebirds or tree swallows.
Your resident birds will thank you by coming back year after year. There’s something incredibly satisfying about watching the same bluebird pair return to a box you’ve maintained, raising multiple broods over multiple years in a space you’ve kept safe and clean for them.
Now grab your gloves and scrub brush. Those birdhouses won’t clean themselves, and your feathered tenants are counting on you 🙂