
Here’s something nobody tells you when you buy your first bird feeder: you’ve basically signed up for a cleaning job. Not once in a while, not when you feel like it, but consistently and thoroughly. I discovered this the hard way when I found a fuzzy green science experiment growing inside what used to be a perfectly good tube feeder. Turns out, birds don’t appreciate moldy food any more than we do. Bird feeder maintenance isn’t optional, it’s literally a matter of life and death for your feathered visitors.
The problem is that most people have no idea how to clean a bird feeder properly 😬. They rinse it with the garden hose, maybe scrub it if they’re feeling ambitious, and call it done. Wrong. Dead wrong. Cleaning bird feeders requires specific methods, proper timing, and genuine commitment to backyard bird care. If you’re not willing to do this right, you’re better off not feeding birds at all.
- Disassemble all feeders completely.
- Tube, hopper, platform, suet, hummingbird, and specialty models.
- Scrub thoroughly with brushes, pipe cleaners, and mild soap.
- Sanitize with bleach (1:9) or vinegar (1:4) based on feeder type.
- Rinse completely; dry in sunlight before refilling.
- Clean the ground under feeders to prevent mold, pests, and disease.
- Wooden feeders → use vinegar.
- Metal feeders → remove rust.
- Hummingbird feeders → change nectar every 3 days.
- Follow a consistent schedule: weekly minimum, more in warm/humid weather.
- Rotate feeders, monitor bird health, and place near protective cover.
Why You Need to Clean Your Bird Feeder
Show Transcript
Let me tell you, I learned a hard lesson about bird feeding the day I peeked into my feeder and found what looked like a fuzzy green science experiment growing inside. Yeah, it was pretty gross, but more importantly, it was incredibly dangerous.
So today, we’re going to dive into exactly how to keep your bird feeder safe and clean. Believe me, it’s a much bigger deal than you might think.
Okay, let’s just get this out of the way right now. When you hang up that shiny new bird feeder, you’re not just a passive bird watcher anymore. You’re a caretaker.
You’ve signed up for a job, and it’s not a job you do just when you feel like it. It has to be consistent and thorough. This isn’t just about keeping things tidy in your backyard for the neighbors. This is literally a matter of life and death for the very birds you’re trying to help.
So, what is it? What makes a dirty feeder so deadly? Let’s get right into it. A feeder brings birds together in unnaturally high numbers. They’re all crowding around, sharing surfaces and food, which means a dirty feeder instantly becomes a breeding ground for pathogens.
Nasty bacteria like salmonellosis can spread like wildfire through the local bird population. One of the most serious threats is aspergillosis, a slow, painful respiratory disease birds get from inhaling mold spores from damp seed. The heartbreaking part? Birds are masters at hiding illness. You might never see the damage until it’s far too late.
Beyond microscopic dangers, old damp seed simply becomes toxic. It’s basically poison. It also invites insects and rodents you definitely don’t want around.
Okay, enough bad news. The good news? Preventing all of this is straightforward.
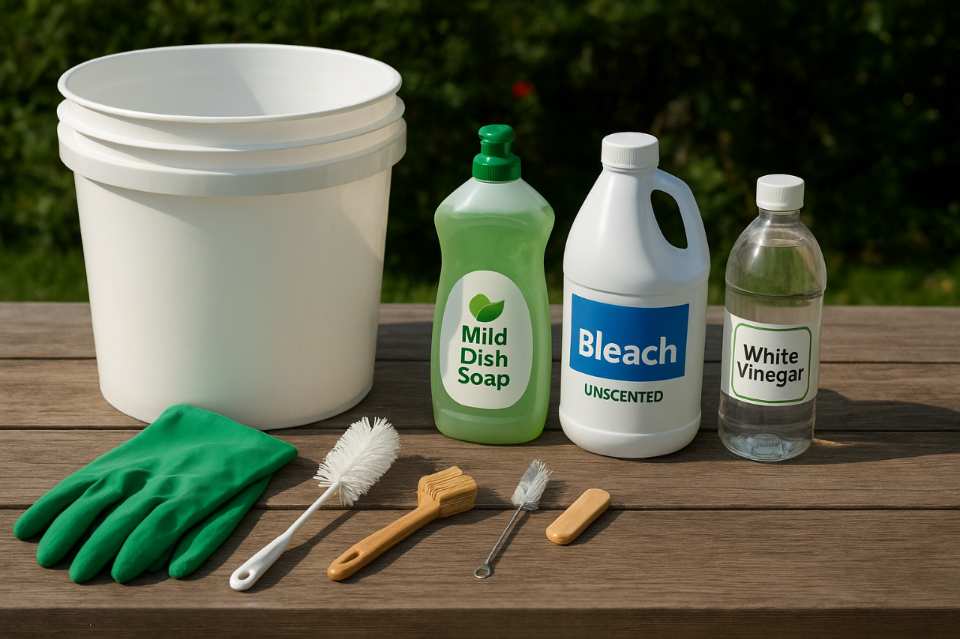
You’ll need a few simple tools: stiff brushes (bottle brushes for tube feeders), pipe cleaners for small ports, basic dish soap, white vinegar, a little unscented bleach, gloves, and a bucket. This is your arsenal in the fight for bird safety.
Before scrubbing, remember safety. Always wear gloves. Work outside or in a ventilated space. Never mix bleach with other cleaners. Bag moldy seed and throw it in the trash.
Now, the step-by-step cleaning process:
Tube feeders are total mold magnets. Take them completely apart. Scrub the inside with a bottle brush and use pipe cleaners for the feeding ports. Sanitize in a mild bleach solution. Rinse thoroughly and let air dry completely. A damp feeder with new seed is a mold factory waiting to happen.
Hopper and platform feeders are easier. Scrub all surfaces and ensure drainage holes are clear. Wooden feeders? Use vinegar instead of bleach. Suet feeders? Scrub cages with hot soapy water. Check metal parts for rust and scrub it off.
Complex feeders like hummingbird or squirrel-proof feeders need extra care. Hummingbird feeders are high-maintenance. Change nectar every three days in warm weather, scrub all ports, and sanitize weekly with vinegar. Never use bleach here. Rinse thoroughly.
For squirrel-proof feeders, follow the instruction manual. Pro tip: take pictures while disassembling. It makes reassembly easier.
Don’t forget the ground beneath feeders. Spilled seed, hulls, and droppings create a “disease zone.” Rake regularly and move feeders occasionally to let the ground recover.
Vinegar is great for gentle, everyday cleaning. Bleach is for monthly deep cleans on plastic or metal feeders. Never mix them.
Cleaning schedule: hummingbird feeders every three days. Standard seed feeders weekly, with a monthly deep clean using bleach. Ground areas and bird baths need weekly attention too.
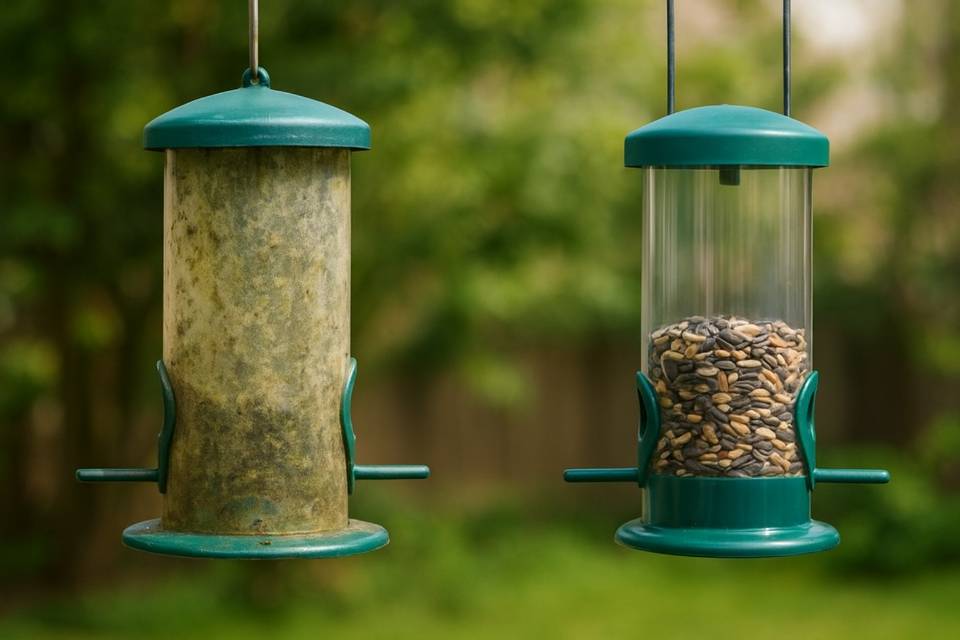
Pro tips: having two sets of feeders helps—one can dry while the other is in use. Use weather guards or baffles to keep seed dry. Watch your birds—clean stations are healthy stations.
Remember, it might feel like a chore, but think about the birds relying on you for a safe meal. That 20 minutes of scrubbing each week could literally be saving lives. Are you giving your birds a truly safe place to eat?
Common Diseases & How to Prevent Them
| Disease | How It Spreads | Prevention |
|---|---|---|
| Salmonellosis | Contaminated seeds and droppings | Clean feeders weekly, rotate feeders, remove moldy seed |
| Aspergillosis (mold-related) | Moisture and mold spores | Dry feeders completely, remove mold, sanitize feeders |
| Fungal infections (general) | Standing water, wet seed accumulation | Avoid wet seed, sanitize feeders regularly |
| Trichomoniasis (canker) | Shared water and feeders | Clean feeders and water sources weekly |
| Avian pox | Contact with contaminated surfaces | Disinfect feeders, keep surfaces dry |
| Parasitic infestations (mites, lice) | Old seed, suet, or nearby nests | Rotate feeders, clean regularly, remove old nesting materials |
Let’s talk about what happens when you neglect feeder hygiene. Spoiler alert: it’s not pretty, and birds die.
Dirty feeders become breeding grounds for bacteria, mold, and fungal spores. According to the Cornell Wildlife Health Lab, salmonellosis is one of the most common diseases spread at bird feeders. Birds congregate at feeders, share the same food and surfaces, and rapidly spread pathogens through entire local populations. One sick bird at your feeder can infect dozens within days.
Mold in feeders creates aspergillosis, a respiratory disease that kills birds slowly and painfully. They struggle to breathe, lose weight, and eventually die. You don’t see this happening because sick birds hide, it’s a survival instinct that keeps them safe from predators. But make no mistake: your dirty feeder is responsible.
The risks don’t end with disease. Old seed spoils, creating toxins that harm birds. Moisture encourages fungal growth. Feces and feather debris accumulate. A field study found that routine cleaning of bird feeders significantly lowers disease severity and parasite loads in wild birds, reinforcing that maintenance is more than aesthetic, it’s vital for avian health.
FYI, bird health depends directly on your maintenance commitment. If you can’t clean feeders properly and consistently, you’re actually harming the birds you’re trying to help.
General Cleaning Supplies and Safety Tips
Safe cleaning for birds requires specific supplies and proper technique. You can’t just throw feeders in the dishwasher and hope for the best.
Essential supplies include stiff brushes (bottle brushes work great for tubes), mild dish soap, white vinegar, unscented household bleach, rubber gloves, and a large bucket or sink. You’ll also want pipe cleaners for narrow ports and an old toothbrush for tight corners.
Safety precautions matter enormously. Always wear gloves when handling dirty feeders, you’re dealing with bird feces, mold spores, and potentially harmful bacteria. Work outdoors or in a well-ventilated area, especially when using bleach. Never mix bleach with other cleaning products; mixing bleach with vinegar or ammonia creates toxic gases.
Proper disposal of old seed is important too. Don’t dump moldy seed where birds can access it. Bag it and trash it.
Step-by-Step Cleaning Guide for All Feeders
Feeder maintenance varies by feeder type, but core principles remain consistent: disassemble completely, scrub thoroughly, sanitize properly, rinse completely, dry fully.
How to Clean a Tube Bird Feeder
Tube bird feeders are notorious for harboring mold in their narrow interiors. The cylindrical design that protects seed from weather also traps moisture and creates ideal mold conditions.
Disassemble completely. Remove the top, bottom, and all perches. Most tube feeders separate into multiple pieces, take them all apart. Empty remaining seed (even if it looks fine, dump it).
Scrub the interior with a long bottle brush. Reach every inch of the tube, paying special attention to the seams where moisture accumulates. Use hot water and dish soap initially. The brush must contact all interior surfaces, don’t just swish it around hoping for the best.
Clean feeding ports with pipe cleaners or a small brush. These tiny openings harbor mold and old seed husks. Push pipe cleaners completely through each port from both directions.
Sanitize using a bleach solution (detailed below). Soak all pieces for 10-15 minutes. This kills bacteria, mold spores, and pathogens that scrubbing misses.
Rinse thoroughly. I mean thoroughly. Any residual bleach harms birds. Rinse each piece under running water for at least 30 seconds. Smell the pieces, if you detect any bleach odor, keep rinsing.
Dry completely before refilling. Moisture + seed = instant mold factory. Air dry in direct sunlight for several hours. UV light from sun provides additional sanitization.
How to Clean Hopper and Platform Feeders
Hopper bird feeders and platform feeders have different challenges than tube feeders. Their larger openings make cleaning easier but their surfaces accumulate more bird droppings.
Empty completely. Remove all seed, even the bits stuck in corners. For wooden bird feeders, pay attention to grain patterns where moisture collects.
Scrub all surfaces with a stiff brush. Platform feeders need aggressive scrubbing because birds walk directly on feeding surfaces, leaving droppings. Rusty metal feeders require wire brushes to remove rust before cleaning.
Address rust immediately. How to clean a rusty metal bird feeder involves removing loose rust with a wire brush, then treating with rust converter if severe. Minor rust can be sanded smooth. Badly rusted feeders should be replaced, rust particles can harm birds.
Clean drainage holes with pipe cleaners. Clogged drainage creates standing water and mold.
Sanitize with bleach or vinegar solution. For wooden bird feeders, vinegar is safer because bleach can damage wood grain. Scrub, let sit 10 minutes, rinse thoroughly.
Dry completely. This is especially critical for wooden feeders, which absorb moisture. Leave disassembled in sun for several hours minimum.
How to Clean a Suet Bird Feeder
Suet bird feeders get gross fast. Rendered fat melts, drips, and creates sticky residue that attracts insects and harbors bacteria.
Remove old suet completely. Don’t leave remnants thinking birds will eat them later. Old fat goes rancid and makes birds sick.
Scrub wire cages with hot soapy water and a stiff brush. Get into every wire junction where fat accumulates. For particularly sticky residue, soak in hot water first to soften fat.
Sanitize with bleach solution. Wire cages tolerate bleach well. Soak 10 minutes, scrub again, rinse thoroughly.
Prevent mold by never leaving partially-eaten suet in feeders for more than a week during warm weather. Fat + heat + time = nasty bacterial growth.
Dry completely before adding new suet. Moisture on wire cages causes new suet to stick oddly and creates uneven melting.
How to Clean a Hummingbird Feeder
Hummingbird feeders require the most frequent cleaning of any feeder type. Change nectar every 3 days during warm weather, more frequently during extreme heat.
Disassemble completely every time. Remove all parts, base, bottle, feeding ports, bee guards, perches. Hummingbird feeders have numerous small parts that all harbor mold.
Scrub feeding ports meticulously with pipe cleaners or specialized port brushes. Mold grows in these tiny openings and kills hummingbirds rapidly. According to expert recommendations, neglected hummingbird feeders cause more harm than good.
Clean the bottle with a bottle brush and hot soapy water. Reach all interior surfaces. Look for black mold spots, if you see any, use bleach solution immediately.
Sanitize weekly even if you’re changing nectar more frequently. Vinegar for cleaning works excellently for hummingbird feeders. Mix 1 part white vinegar to 4 parts water, soak 1 hour, scrub, rinse thoroughly.
Rinse exhaustively. Hummingbirds are incredibly sensitive to chemical residues. Rinse until water runs completely clear and you detect zero odor of vinegar or bleach.
Dry completely before refilling with fresh nectar. Even tiny amounts of water dilute nectar concentration and promote mold growth.
How to Clean Specialty and Squirrel-Proof Feeders
Specialty feeders like Squirrel Buster, Bird Buddy, Roamwild, or Droll Yankee models have unique mechanisms that require special attention.
Consult manufacturer instructions first. Squirrel-proof bird feeders contain springs, counterweights, and closing mechanisms that can be damaged by improper cleaning. Most manufacturers provide specific cleaning guidance.
Disassemble carefully. Note how pieces fit together before removing them. I photograph specialty feeders with my phone before disassembling so I remember the reassembly order 🙂
Clean mechanical parts gently. Springs and moving mechanisms need cleaning but avoid harsh scrubbing that damages function. Wipe with damp cloths, use soft brushes on visible surfaces.
Lubricate moving parts after cleaning if manufacturer recommends. Some squirrel-proof feeders need petroleum jelly or silicone lubricant on moving parts to maintain smooth operation.
Test functionality before refilling. Make sure weight-activated closures still work and springs move freely.
How to Clean the Ground Under Your Bird Feeder
Feeder surroundings matter as much as the feeder itself. Spilled seed, hulls, and droppings accumulate under feeders, creating disease zones.
Rake regularly under feeding areas. Accumulated seed hulls, droppings, and spilled seed attract rodents and spread disease. I rake under my feeders weekly during active feeding seasons.
Remove moldy seed immediately. According to backyard bird hygiene principles, moldy seed on the ground is just as dangerous as moldy seed in feeders. Bag it and trash it.
Prevent seed accumulation by using platform feeders with drainage or switching to no-waste seed blends. Black oil sunflower hearts create less waste than whole seeds.
Consider rotating feeding locations every few months. This prevents any single area from becoming a disease hotspot. Move feeders 10-15 feet to fresh ground periodically.
Cleaning Solutions: Vinegar vs. Bleach Methods
Vinegar for cleaning and bleach solution for feeders both work effectively but have different applications.
Vinegar Method
Vinegar and water (1:4 ratio) provides gentle, safe cleaning for most feeder materials. According to various bird feeding resources, vinegar effectively kills bacteria and mold while being safer for wooden feeders and less harsh on plastic.
Mix 1 cup white vinegar with 4 cups water. Soak feeder parts for 1 hour. Scrub with brush. Rinse thoroughly. This method works particularly well for wooden bird feeders and hummingbird feeders where chemical residues are concerning.
The downside: vinegar doesn’t kill all pathogens as effectively as bleach. Use vinegar for routine weekly cleaning but switch to bleach for deep sanitization every few weeks.
Bleach Solution Method
Bleach solution (1:9 ratio) provides maximum sanitization. Mix 1 part unscented household bleach with 9 parts water. This concentration kills virtually all bacteria, viruses, mold, and fungal spores.
Soak feeder parts for 10-15 minutes maximum. Longer soaking can damage plastic and wood. Scrub during soaking to maximize contact. Rinse incredibly thoroughly, bleach residue kills birds.
According to Audubon, which cites the National Wildlife Health Center, feeders and bird baths should be cleaned with a solution of one part bleach to nine parts water, especially when there’s visible debris or signs of disease.
Never mix bleach with vinegar or ammonia. These combinations create toxic chlorine gas that can seriously harm or kill you. Choose one cleaning agent per cleaning session.
How to Clean Mold from Feeders
How to clean a bird feeder with mold requires immediate action and thorough sanitization. Mold appears as black, green, or white fuzzy growth anywhere moisture accumulates.
Discard all seed immediately if you see mold. Don’t try to salvage it. The visible mold is just the surface, mold spores contaminate all seed in the feeder.
Use bleach solution for moldy feeders. Vinegar isn’t strong enough for established mold colonies. Soak in 1:9 bleach solution for 15 minutes, scrub aggressively, rinse exhaustively.
Inspect for persistent mold. If mold returns within days after cleaning, your feeder has design flaws that trap moisture. Consider replacing it with a better-designed model.
Prevent mold by keeping feeders in partial shade, using drainage holes, avoiding overfilling, and cleaning weekly minimum.
Proper Cleaning Frequency: How Often to Clean
Feeder maintenance schedule varies by feeder type, season, and weather conditions.
Hummingbird feeders: Every 3 days during warm weather, every 5 days during cool weather. More frequently during extreme heat (daily if necessary). Change nectar on this schedule regardless of how much remains.
Tube, hopper, and platform feeders: Weekly minimum during active feeding seasons. Twice weekly during hot, humid weather. Every 2 weeks during winter if weather stays cold and dry.
Suet feeders: Every 2-3 weeks, more frequently if suet shows mold or melts in hot weather.
Ground feeding areas: Weekly raking minimum, more frequently if feeding large flocks.
Deep cleaning: Monthly deep cleaning with bleach solution for all feeders regardless of visible cleanliness. Pathogens multiply invisibly.
According to recommendations from bird health experts, these frequencies represent minimums, not goals. More frequent cleaning is always better. Learn more about winter bird feeding to understand how cold weather affects cleaning needs.

Extra Tips for Healthy Feeding Practices
Backyard bird care extends beyond just cleaning feeders. Comprehensive hygiene practices support healthier bird populations.
Rotate multiple feeders. Keep 2-3 feeders per type and rotate them on cleaning days. While one dries after cleaning, another stays in service. This ensures birds always have access to food while maintaining hygiene standards.
Avoid overcrowding. Too many birds at one feeder spreads disease faster. Distribute feeders throughout your yard to reduce crowding. Consider how to attract birds without a feeder to reduce pressure on individual feeding stations.
Keep food dry. Moisture turns good seed into deadly mold within days. Position feeders under eaves or use feeders with rain guards. IMO, weather protection is underrated in feeder selection.
Monitor bird behavior. Sick birds appear fluffed, lethargic, or have crusty eyes. If you observe sick birds at your feeders, remove all feeders immediately for 2 weeks, then deep clean before reinstalling. This break allows sick birds to disperse and prevents ongoing transmission.
Safe placement reduces disease and predation. Position feeders near protective cover but away from dense vegetation where predators hide. Maintain clear ground zones under feeders. Learn about how to protect baby birds from predators for comprehensive safety strategies.
Water sources need equal attention. Bird baths require the same cleaning frequency as feeders, weekly minimum. Check out our guide on how to clean a bird bath without chemicals for detailed instructions.
Conclusion: Commit to Feeder Hygiene
How to clean a bird feeder properly isn’t complicated, but it requires consistency and commitment. Disassemble completely, scrub thoroughly, sanitize with vinegar or bleach, rinse exhaustively, dry fully. Follow type-specific guidance for tube, hopper, platform, suet, and hummingbird feeders. Clean weekly minimum, more frequently during warm weather or active feeding periods.
The difference between a bird feeder that helps birds and one that harms them comes down to maintenance. Dirty feeders kill birds, not dramatically or obviously, but steadily and surely. Disease spreads silently through bird populations, and your neglected feeder contributes to that transmission.
Clean feeders take maybe 20 minutes weekly. That small time investment prevents disease outbreaks, supports healthy local bird populations, and ensures the birds you’re trying to help actually benefit from your efforts. It’s literally the least we can do for creatures that bring us joy and entertainment.
Last spring, I watched a goldfinch family visit my tube feeder daily for three months. Those birds trusted that the food I provided was safe. That trust carries responsibility. I keep that family in mind every time I’m scrubbing feeders and thinking about skipping the rinse cycle. They deserved my best effort, and so do the birds visiting your feeders.