
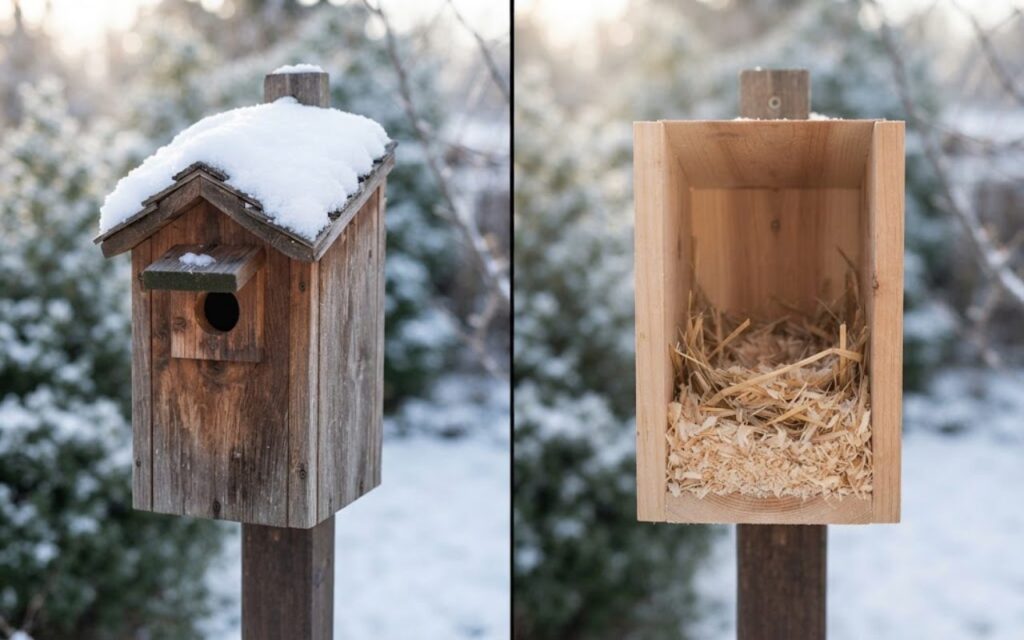
Successfully insulating a birdhouse for winter requires understanding the distinct biological shift between spring nesting and freezing winter roosting. While standard wooden boxes shelter active summer broods, subzero winter survival pushes small songbirds to their absolute physical limits. Uninsulated, drafty cedar cavities frequently fail to protect communal sleepers from catastrophic overnight heat loss.
Transforming a standard breeding box into a secure winter sanctuary demands organic materials that trap heat without holding dangerous condensation. Applying a few field-tested modifications and eliminating synthetic stuffing errors easily shields vulnerable local populations from frost. These basic seasonal adjustments ensure your backyard birdhouses remain premium, life-saving shelter hubs through the coldest snaps.
Converting Nesting Boxes to Roosting Havens: Entrance Geometry and Heat Trapping
In standard spring setups, entrance holes sit near the roofline to provide airflow and keep growing nestlings cool. For winter survival, community builders invert this geometry by flipping the front faceplate so the hole sits near the floor. Because warm air naturally rises, placing the hole at the bottom traps the birds’ metabolic body heat in the ceiling canopy of the box.
Multiple birds often pack together to share thermal mass, with bluebirds sometimes stacking more than a dozen individuals into a single cavity. Standard smooth interior walls make it difficult for lower birds to climb out or for upper birds to find purchase. Installing staggered interior perches or raw structural climbs prevents birds from smothering one another.
- Secure a strip of 0.25-inch galvanized hardware cloth to the interior front and side walls to serve as an emergency climbing ladder.
- Insert removable, staggered wooden dowels across the upper third of the box so communal birds roost at varying heights without defecating directly on flock mates below.
- Avoid exterior perches beneath the entrance hole, as these give nocturnal predators like raccoons and feral cats a mechanical foothold.
A properly configured roosting layout retains thermal pockets without compromising the birds’ ability to exit rapidly during morning emergence.
Safe Thermal Bedding: Kiln-Dried Pine Versus Lethal Synthetic Fibers
Hobbyist forums regularly document well-intentioned backyard birders packing birdhouses with household dryer lint, wool yarn, or shredded cotton swabs. These synthetic materials represent absolute death traps for small birds during wet winter months.
Cotton and lint hold ambient atmospheric moisture, absorb avian waste, and lose all insulating capacity when damp, chilling birds directly into hypothermia. Synthetic thread loops also snag delicate avian toes, causing circulation loss and gangrene.
Even worse, synthetic fiberglass insulation releases microscopic glass fibers that severely damage avian respiratory systems when birds peck at interior walls. Natural, coarse materials that shed water and resist fungal development must always take precedence over indoor textiles.
- Kiln-dried white pine shavings provide excellent thermal loft while remaining firm enough not to compress into dense, cold mats.
- Dried native white pine needles offer natural springiness and promote drainage if wet snow enters the entrance hole.
- Clean wood shavings must never include aromatic cedar, as volatile cedar oils cause chronic mucosal and lung irritation in passerines.
Layer clean bedding approximately one to two inches deep along the box floor before winter storms arrive.
Draft Elimination and the Physics of Condensation Management
Sealing a birdhouse completely airtight to prevent freezing winds is a dangerous mistake. Birds exhale significant quantities of warm water vapor every hour as they burn fat reserves to maintain internal body temperatures near 104 degrees Fahrenheit.
Without strategic high-level ventilation, this metabolic moisture condenses against cold wooden roof panels and drips down onto plumage, leading to hypothermia. Experienced rehabilitators focus on sealing horizontal seams against drafts while preserving tiny upper air channels.
Draft reduction should always target the lower half of the box where resting birds cluster. Removable weather seals allow you to reverse these modifications before humid spring breeding seasons begin.
- Fill deep sidewall cracks and side panel gaps using exterior-grade silicone caulk applied strictly to the outer exterior seams.
- Insert temporary strips of closed-cell foam backing rod along the lower access door joints to block direct wind drafts.
- Keep two 0.25-inch drainage holes open in the floor corners to ensure melted snow and condensed moisture evacuate immediately.
Controlled vertical airflow ensures that humid air vents out the top while the birdhouse floor remains dry and thermally stable.
Exterior Box Cladding and Baffle Modifications for Extreme Subzero Drops
When ambient temperatures drop well below zero, standard three-quarter-inch timber walls lose internal thermal energy through conductive transfer. Installing insulation inside the cavity risks ingestion and claw entanglements, making exterior-only modifications the gold standard for freeze mitigation.
Bolting insulating panels directly to the outside shell dramatically slows thermal dissipation through the wood grain. Rigid extruded polystyrene or cork sheets make ideal outer cladding when properly shielded against curious woodpeckers and squirrels.
Always encase soft exterior insulation behind a thin sacrificial cedar or exterior plywood panel. This sandwich design protects the synthetic barrier from chewing while adding structural wind resistance to the entire assembly.
- Cut panels of 0.5-inch rigid cork sheet and mount them flush to the external side and rear walls using stainless steel screws.
- Add an extended weather hood or angled wooden awning over the entrance hole to shield the interior from driving sleet and drifting snow.
- Mount an 8-inch metal predator baffle beneath the mounting post to prevent winter rodents from colonizing the insulated structure.
Reflective outer shields also bounce away freezing winter rains, preserving the dry core of the roosting structure through intense blizzards.
Sanitization Protocols and Winter Roost Pest Inspections
Before converting any nesting box into a winter roost, a complete sanitation pass is mandatory to eliminate lingering summer parasites. Old nest materials frequently harbor mites, blowfly larvae, and fleas that re-emerge during unseasonably mild winter thaws.
Leaving old nests in place under the assumption that they provide insulation exposes winter birds to heavy parasite loads that sap critical winter energy. Wet, uncleaned organic matter also forms a prime substrate for dangerous fungal pathogens like Aspergillus flavus.
Inhaling fungal spores causes severe avian respiratory aspergillosis, which is almost universally fatal in small wild birds. Regular winter checks ensure that moisture has not breached the cavity walls.
- Scrape away all old nesting debris down to the bare wood using a stiff putty knife.
- Scrub the internal walls with a 1:9 bleach-to-water dilution soaking, or wash thoroughly with boiling water to kill dormant fungal spores.
- Allow the interior wood to dry completely in direct sunlight for at least 48 hours before adding fresh wood shavings.
- Perform a quick check every three to four weeks, replacing damp floor shavings immediately with fresh dry substrate.
Thorough hygiene protocols ensure that your insulated winter birdhouse provides a safe, restorative refuge until the spring nesting season returns.