
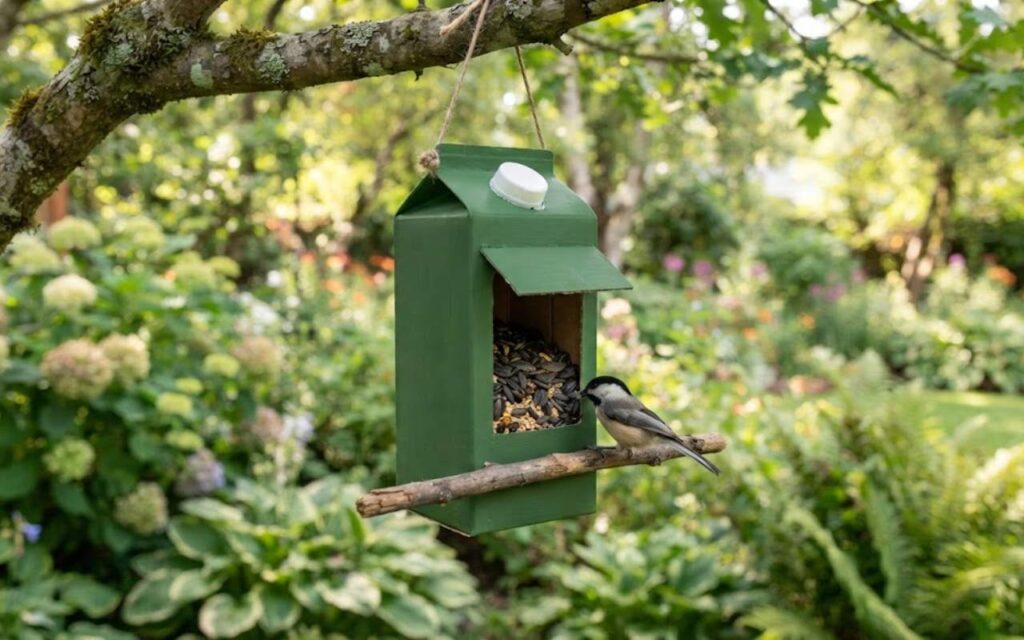
Learning how to build a diy milk carton bird feeder is one of the easiest, most rewarding weekend upcycling projects you can tackle with your family. With just an empty carton, a pair of scissors, and some non-toxic paint, you can turn household trash into a bustling backyard diner for your neighborhood birds.
This zero-waste craft creates an instant feeding station that invites lively wildlife directly to your backyard viewing space. Upcycled paper cartons offer an accessible, budget-friendly gateway into backyard birding without the expense of commercial hopper setups.
With proper drainage, secure perches, and weather-conscious placement, your homemade feeder will safely attract energetic backyard visitors while keeping your seed dry.
Quick-Glance Field Summary
Upcycling a paper-board carton requires adding mechanical bottom drainage, wrapped landing edges, and a stable perch to protect lightweight backyard visitors. Hang the finished unit sheltered inside dense foliage to keep rainwater off the cardboard and shield feeding birds from high winds.
- Base material: 1 half-gallon paper milk or juice carton with wax or poly-coating
- Perch assembly: 1 wooden chopstick or quarter-inch dowel, five to six inches long
- Drainage tooling: Single-hole paper punch, awl, or utility knife for floor perforations
- Suspension rig: 24 inches of jute twine or untreated cotton cord
- Weatherproofing: Non-toxic, zero-VOC acrylic exterior craft paint with non-toxic matte sealer
- Target species: Black-capped Chickadees, Tufted Titmice, House Finches, and American Goldfinches
- Feed selection: Black oil sunflower seeds or safflower seeds to prevent early spoilage
What Materials and Tools Do You Need?
You need a clean paper milk carton, a wooden chopstick, weather-resistant twine, child-safe acrylic paint, and a craft blade to build a durable feeder. These accessible household items keep project costs at zero while producing an effective feeding station for small songbirds.
Standard half-gallon wax-coated paper cartons work significantly better than thin plastic jugs. The thick paperboard provides insulation against direct sun, holds non-toxic acrylic paint securely, and gives birds better grip along the outer walls.
Wash the carton using hot water and a mild dish soap to strip away residual fats that could host bacteria. Do not pour boiling water inside wax-coated cartons, as extreme heat dissolves the protective wax layer and compromises the paper structure.
Avoid using slick plastic containers or cartons that previously held dairy products unless they are thoroughly sanitized. Gather your supplies on a flat, dry workspace before cutting into the carton.
- 1 thoroughly rinsed, dry half-gallon paper milk or juice carton
- 1 five-inch wooden chopstick, pencil, or unpainted quarter-inch wood dowel
- 24 inches of natural jute cord, hemp twine, or braided cotton rope
- 1 craft utility knife or pair of heavy-duty household shears
- 1 bottle of non-toxic, water-based outdoor acrylic paint
- 1 roll of paper masking tape or fabric cloth tape to protect bird feet
Avoid using synthetic spray paints, industrial solvent varnishes, or solvent-based glues. Hobbyists sharing crowd-sourced tips on the Reddit r/BackYardBirds Community frequently warn against using smooth chopsticks or plastic straws because tiny songbirds cannot grip slick surfaces securely.
Instead, gather rough, bark-covered twigs from your yard that measure roughly a quarter-inch in diameter. Natural bark provides authentic foot purchase for delicate bird toes, allowing visitors to land and take off without sliding.
How to Prepare and Build Your Feeder Step by Step
To assemble your feeder, cut feeding portals into the carton sides, install a cross-dowel perch, punch bottom drainage holes, and secure a balanced hanging cord. Following this sequential construction order prevents structural tears in the paperboard and keeps your seed dry.
- Step 1: Sanitize and dry the empty milk carton completely using warm water and mild, fragrance-free dish soap to remove all sour milk residue.
- Step 2: Measure and mark two access windows on opposite faces of the carton, positioning the bottom cut line roughly two inches above the base.
- Step 3: Cut out the rectangular openings with your craft blade, leaving the bottom two inches intact to form a deep seed basin.
- Step 4: Smooth the cut raw cardboard edges by folding strips of paper masking tape over the rim so visiting birds do not scrape their feet.
- Step 5: Pierce two matching holes directly beneath the cut windows, then slide your wooden chopstick straight through the carton to create a dual-sided perch.
- Step 6: Puncture eight to ten small drainage pinholes through the bottom cardboard floor using a clean nail or awl.
- Step 7: Thread your jute twine through two reinforced holes punched in the folded top carton ridge, tying an overhand knot to secure the hanger.
Make sure your through-perch fits snugly through both sides of the carton rather than resting loosely in single-sided cuts. Community builders report that unsecured single dowels spin freely under bird weight, causing visiting finches to lose balance and abandon the feeder.
Allow all paint to cure in a warm room for twenty-four hours before loading seed. Filling wet or tacky feeders risks transferring wet pigments onto avian foot scales and facial feathers.
How Do You Weatherproof the Cardboard and Protect the Seed?
You weatherproof a milk carton feeder by applying non-toxic water-based acrylic sealer and hanging the craft beneath dense tree boughs to block rain. These passive measures prevent cardboard saturation, maintain seed quality, and eliminate the need for costly commercial plastic covers.
Unprotected paperboard feeders face real structural threats during prolonged autumn storms. Damp seed inside poorly ventilated basins quickly breeds fungal molds, specifically Aspergillus flavus, which produces dangerous aflatoxins that can sicken small songbirds.
Zero-cost natural placement provides your best defense against moisture damage.
- Nest your feeder inside the interior branches of an evergreen tree or dense cedar hedge
- Tuck the carton directly beneath a porch roof, patio awning, or shed eave
- Position the feeder within three feet of your window to prevent high-speed avian window strikes
- Angle the feeding portal windows away from prevailing western and northern wind directions
Puncturing adequate mechanical drainage in the floor remains mandatory regardless of hanging location. Any rainwater driven sideways through the access windows must drain immediately before soaking the lower layer of your seed hopper.
If a severe multiday rain system approaches your area, simply unhook the feeder and store it indoors. This quick manual intervention keeps your seed dry, avoids wasted feed, and extends the physical lifespan of your paper craft.
Hanging Your Feeder Safely to Prevent Window Strikes and Pests
Suspend your feeder either within 3 feet of a window or at least 30 feet away from exterior glass to prevent fatal bird collisions. This spacing follows established avian safety guidelines and protects birds startled by sudden movements or neighborhood cats.
The American Bird Conservancy Home Solutions Guide notes that feeders placed within 3 feet prevent birds from building enough flight speed to cause injury if they startle against the pane.
Conversely, as highlighted by the National Audubon Society Collision Guide, placing the feeder more than 30 feet away allows approaching birds enough clearance to recognize window reflections. Never place a feeder at intermediate distances where glass reflections appear continuous with surrounding foliage.
To deter squirrels without purchasing expensive hardware baffles, hang your lightweight feeder deep within dense evergreen branches. Conifer foliage creates a natural weather umbrella that breaks strong winds and keeps rain off the feeder. Furthermore, squirrels struggle to balance on thin outer twigs, which naturally reserves the feeder for lightweight, agile songbirds.
- Black-capped Chickadees and Carolina Chickadees
- Tufted Titmice and Oak Titmice
- House Finches and Purple Finches
- American Goldfinches and Lesser Goldfinches
- White-breasted Nuthatches and Red-breasted Nuthatches
Select your bird seed carefully to match the physical capabilities of these smaller species. Avoid cheap commercial seed blends packed with red milo, cracked corn, and wheat fillers, which small clingers simply kick onto the ground.
Black oil sunflower seeds offer the highest concentration of raw fat and protein for overwintering songbirds. Alternatively, white safflower seed provides dense nutrition while naturally deterring invasive House Sparrows and neighborhood squirrels from monopolizing the small perch.
How Do You Clean, Maintain, and Retire Your Feeder?
You maintain a milk carton feeder by wiping down the interior weekly, clearing drainage pinholes, and discarding the entire unit once the paperboard weakens. Replacing these upcycled feeders every four to six weeks prevents bacterial buildup without requiring harsh chemical soaking.
Hard plastic and cedar feeders can withstand heavy scrubbing, but wet paperboard softens rapidly under continuous running water. Routine maintenance should focus on dry brushing and spot sanitation rather than deep, prolonged soaking.
Inspect the structural condition of your carton every time you replenish the seed reservoir.
- Brush out old hulls, seed dust, and wet clumping particles using a clean, dry paintbrush
- Clear clogged bottom drainage holes with a wooden toothpick or straightened paperclip
- Wipe the perch dowel with a cloth moistened in a mild white vinegar and water mix
- Inspect the jute hanging twine for fraying, fiber rot, or loose top knots
Backyard forum members often note that attempts to salvage moldy paper cartons fail, as moisture deeply penetrates porous paper layers. If you notice internal black spotting, fungal smells, or waterlogged seams, retire the feeder immediately into your compost or waste bin.
Because you used a salvaged household carton, replacing the station costs nothing. You can simply turn another milk carton into a fresh, clean feeder during your next weekend project.