
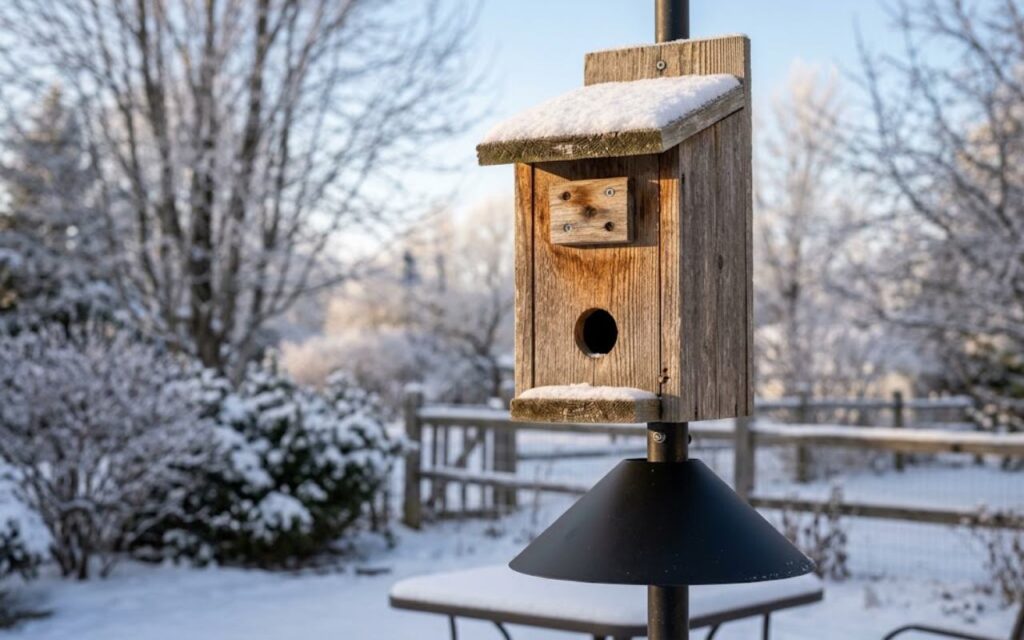
Learning how to turn a standard birdhouse into a cozy winter roost box is one of the most effective strategies backyard conservationists can employ to protect small passerines during extended sub-zero weather events. Wintering songbirds such as Black-capped Chickadees, Tufted Titmice, and Eastern Bluebirds face extreme thermal stress when overnight ambient temperatures plummet. These tiny species naturally scale up their pectoralis muscle mass and shivering metabolic capacity by 20 to 30 percent, yet access to a secure, draft-free shelter remains vital for their overnight survival.
Standard nesting boxes are fundamentally designed to dissipate heat during warm spring afternoons through cross-ventilation slots and elevated entry holes. By reversing these summer cooling features, you transform an empty nesting site into an energy-saving communal thermal trap. The modification process requires basic hand tools, safe materials, and a functional understanding of avian winter physics.
Inverting the Front Baffle to Eliminate Convective Chimney Heat Loss
IIn a typical summer nesting box, the entrance hole sits near the roofline to allow hot air to escape and to keep nestlings out of reach of predators. In winter conditions, this high opening creates a chimney effect that vents warm air produced by huddled birds directly out into the freezing atmosphere.
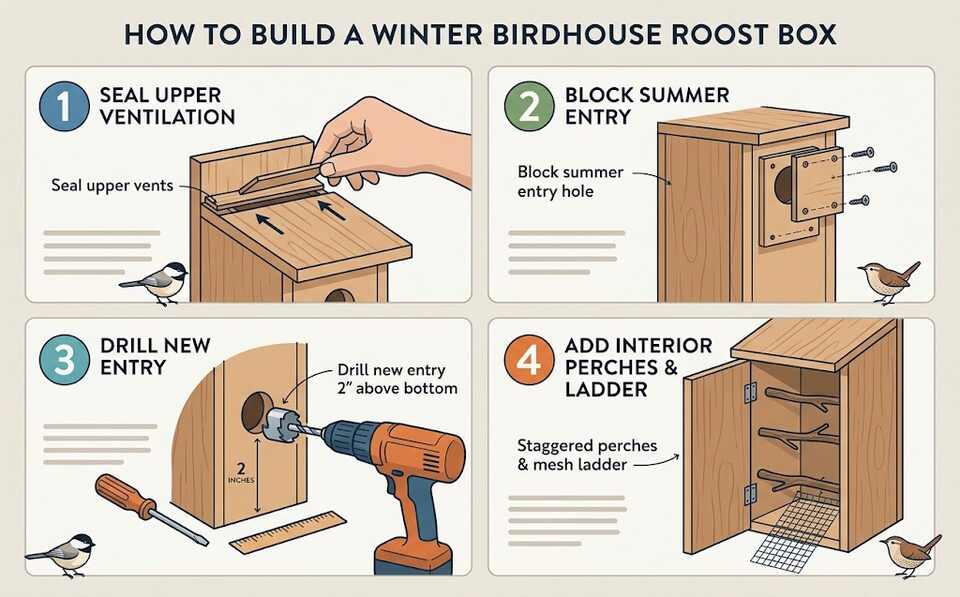
While some flat-roofed birdhouses allow you to remove the front panel and reattach it upside down to instantly lower the hole, standard sloped-roof designs will not accommodate a flipped panel due to the angled side cuts. To achieve the same low-entry effect on a sloped-roof box, block the original summer entrance hole completely using a secure wooden block or a commercial portal protector.
Next, drill a new winter entrance hole precisely two inches above the floor panel. This layout creates a rising thermal pocket in the upper two-thirds of the box where warm air stays trapped. Cavity roosters will cluster near the ceiling, retaining their communal body warmth throughout the coldest hours before dawn, while the low entry hole prevents driving horizontal sleet and freezing rain from blowing directly onto them.
When drilling your winter hole or adjusting your panel, verify that the hole diameter precisely matches your target species’ requirements:
- Downy Woodpecker: 1.25-inch diameter entrance hole placed two inches above the floor
- Black-capped Chickadee: 1.125-inch diameter entrance hole placed two inches above the floor
- Eastern Bluebird: 1.5-inch diameter entrance hole placed two inches above the floor
- Tufted Titmouse: 1.25-inch diameter entrance hole placed two inches above the floor
- White-breasted Nuthatch: 1.25-inch diameter entrance hole placed two inches above the floor
Verify that the hole diameter precisely matches your target species. An opening larger than 1.5 inches allows European Starlings or predatory squirrels to enter and displace native songbirds. When spring returns, simply plug the lower hole and reopen the top one to transition the box back to a standard nesting site.
Draft Sealing Ventilation Gaps and Managing Condensation Accumulation
Spring nesting structures feature open air slots along the eaves and under the roof overhang to prevent nestling hyperthermia. During winter, these gaps act as wind tunnels that strip the insulating microclimate away from resting flocks. You must seal these upper ventilation slots while preserving minimal floor-level drainage for metabolic moisture.
Avian forum communities frequently recommend using removable materials such as temporary weather-stripping foam cord or exterior-grade painter’s tape pressed firmly over exterior gaps. Avoid expanding aerosol spray foams or toxic silicone sealants, as off-gassing chemical fumes cause acute respiratory failure in small birds. Wooden shims secured with exterior screws provide a durable, reusable seal that can be unscrewed when spring returns.
Do not completely seal the floor drainage holes at the base of the box. Roosting birds produce significant water vapor through respiration, and trapped moisture will saturate down feathers and compromise their loft. Preserving tiny floor weep holes ensures excess moisture drains away before it condenses on internal surfaces.
Engineering Staggered Interior Roost Perches and Hardware Cloth Ladders
A standard birdhouse contains an open interior void intended for a single cup nest resting flat on the floor. Winter roosting requires three-dimensional perching architecture so multiple birds can share ambient heat without smothering one another. Without interior climbing surfaces, birds forced to sit directly on the floor suffer higher rates of heat loss through ground conduction.
Installing staggered perches allows a dozen or more bluebirds or wrens to roost vertically inside a single compact cavity. Instead of smooth, round commercial dowels, which cause avian foot fatigue and lack the necessary traction for a sleeping bird, use flat wooden slats, textured rough-sawn lumber strips, or small natural twigs with intact bark.
Insert these textured perches at staggered heights, ensuring that no perch sits directly underneath another to avoid droppings soiling the birds below. Never install exterior perches outside the entrance hole, as these give predators an easy foothold to ambush occupants.
- Galvanized steel hardware cloth with 0.25-inch mesh stapled flush against the back interior wall
- Untreated rough-sawn wood slats or natural bark-covered twigs measuring 0.375 to 0.5 inches in diameter
- Exterior predatory baffle measuring eight inches in diameter mounted on the support pole
- Corrosion-resistant stainless steel deck screws to secure internal mounting brackets
Stapling a sheet of 0.25-inch galvanized hardware cloth to the interior rear wall provides an ideal climbing surface for clinging species. Woodpeckers, nuthatches, and creepers naturally prefer hanging vertically against bark textures rather than resting horizontally on perches. Ensure all wire ends are folded under or filed smooth to prevent abrasions on fragile foot pads.
Safe Insulating Substrates to Mitigate Dampness and Fungal Pathogens
Before adding winter bedding, the birdhouse must be stripped of all old nesting materials left over from the breeding season. Old nests harbor parasites including mites, fleas, and blowfly puparia that awaken during mild winter spells to feed on roosting birds. Thoroughly clean the interior using a 1:9 bleach-to-water dilution soaking, followed by a complete rinse and full drying cycle in direct sunlight.
Never use standard pet-store cedar shavings, fine sawdust, or synthetic nesting fibers inside a roost box. Cedar releases aromatic hydrocarbons that irritate avian mucous membranes, while fine sawdust easily enters respiratory air sacs. Synthetic yarns and cotton bedding do not break down, creating severe entanglement hazards for avian limbs.
- Coarse untreated aspen wood shavings distributed one to two inches deep across the base
- Clean dried white pine needles laid flat to provide a springy insulating floor barrier
- Untreated coarse wood shavings layered under interior perches to capture nitrogenous waste
- Clean unprinted corrugated cardboard cut to friction-fit against interior side walls for thermal buffering
Agricultural straw and dried hay should also be avoided because they trap moisture and rapidly culture Aspergillus flavus. This fungal pathogen produces dangerous aflatoxins and causes lethal avian aspergillosis when spores are inhaled in enclosed, damp roost cavities. Clean aspen shavings or dry pine needles offer thermal resistance without harboring moisture.
Solar Aspect Orientation and Predator Baffle Clearance Protocols
Box placement is just as critical as internal box modifications when sub-zero blizzards hit your yard. Summer boxes are often placed in partial shade to prevent heat stroke in developing chicks, but winter roost boxes require maximum solar exposure. Mount your roost box facing south or southeast to absorb passive solar radiation from early morning sunlight.
This southeastern orientation also positions the solid back and roof of the box against prevailing north and northwest winter storm winds. Ensure the structure is securely fastened so high winter wind gusts do not rock the box and break the birds’ nocturnal torpor. Roosting passerines drop their core body temperature by several degrees overnight to conserve energy, leaving them slow to react to physical disturbances.
Mount the structure on a dedicated metal pole between five and ten feet off the ground rather than directly onto a tree trunk. Trees provide direct runway access for mice, squirrels, raccoons, and domestic cats looking for a concentrated winter food cache. Install a steel torpedo or stovepipe baffle beneath the roost box to guarantee that sleeping songbirds remain safe throughout the long winter nights.